How to migrate from WordPress to Webflow without losing SEO rankings

Date
Jun 9, 2026
Time estimated
05
mins
Build faster. Launch without a queue. Give your marketing team control they actually have.

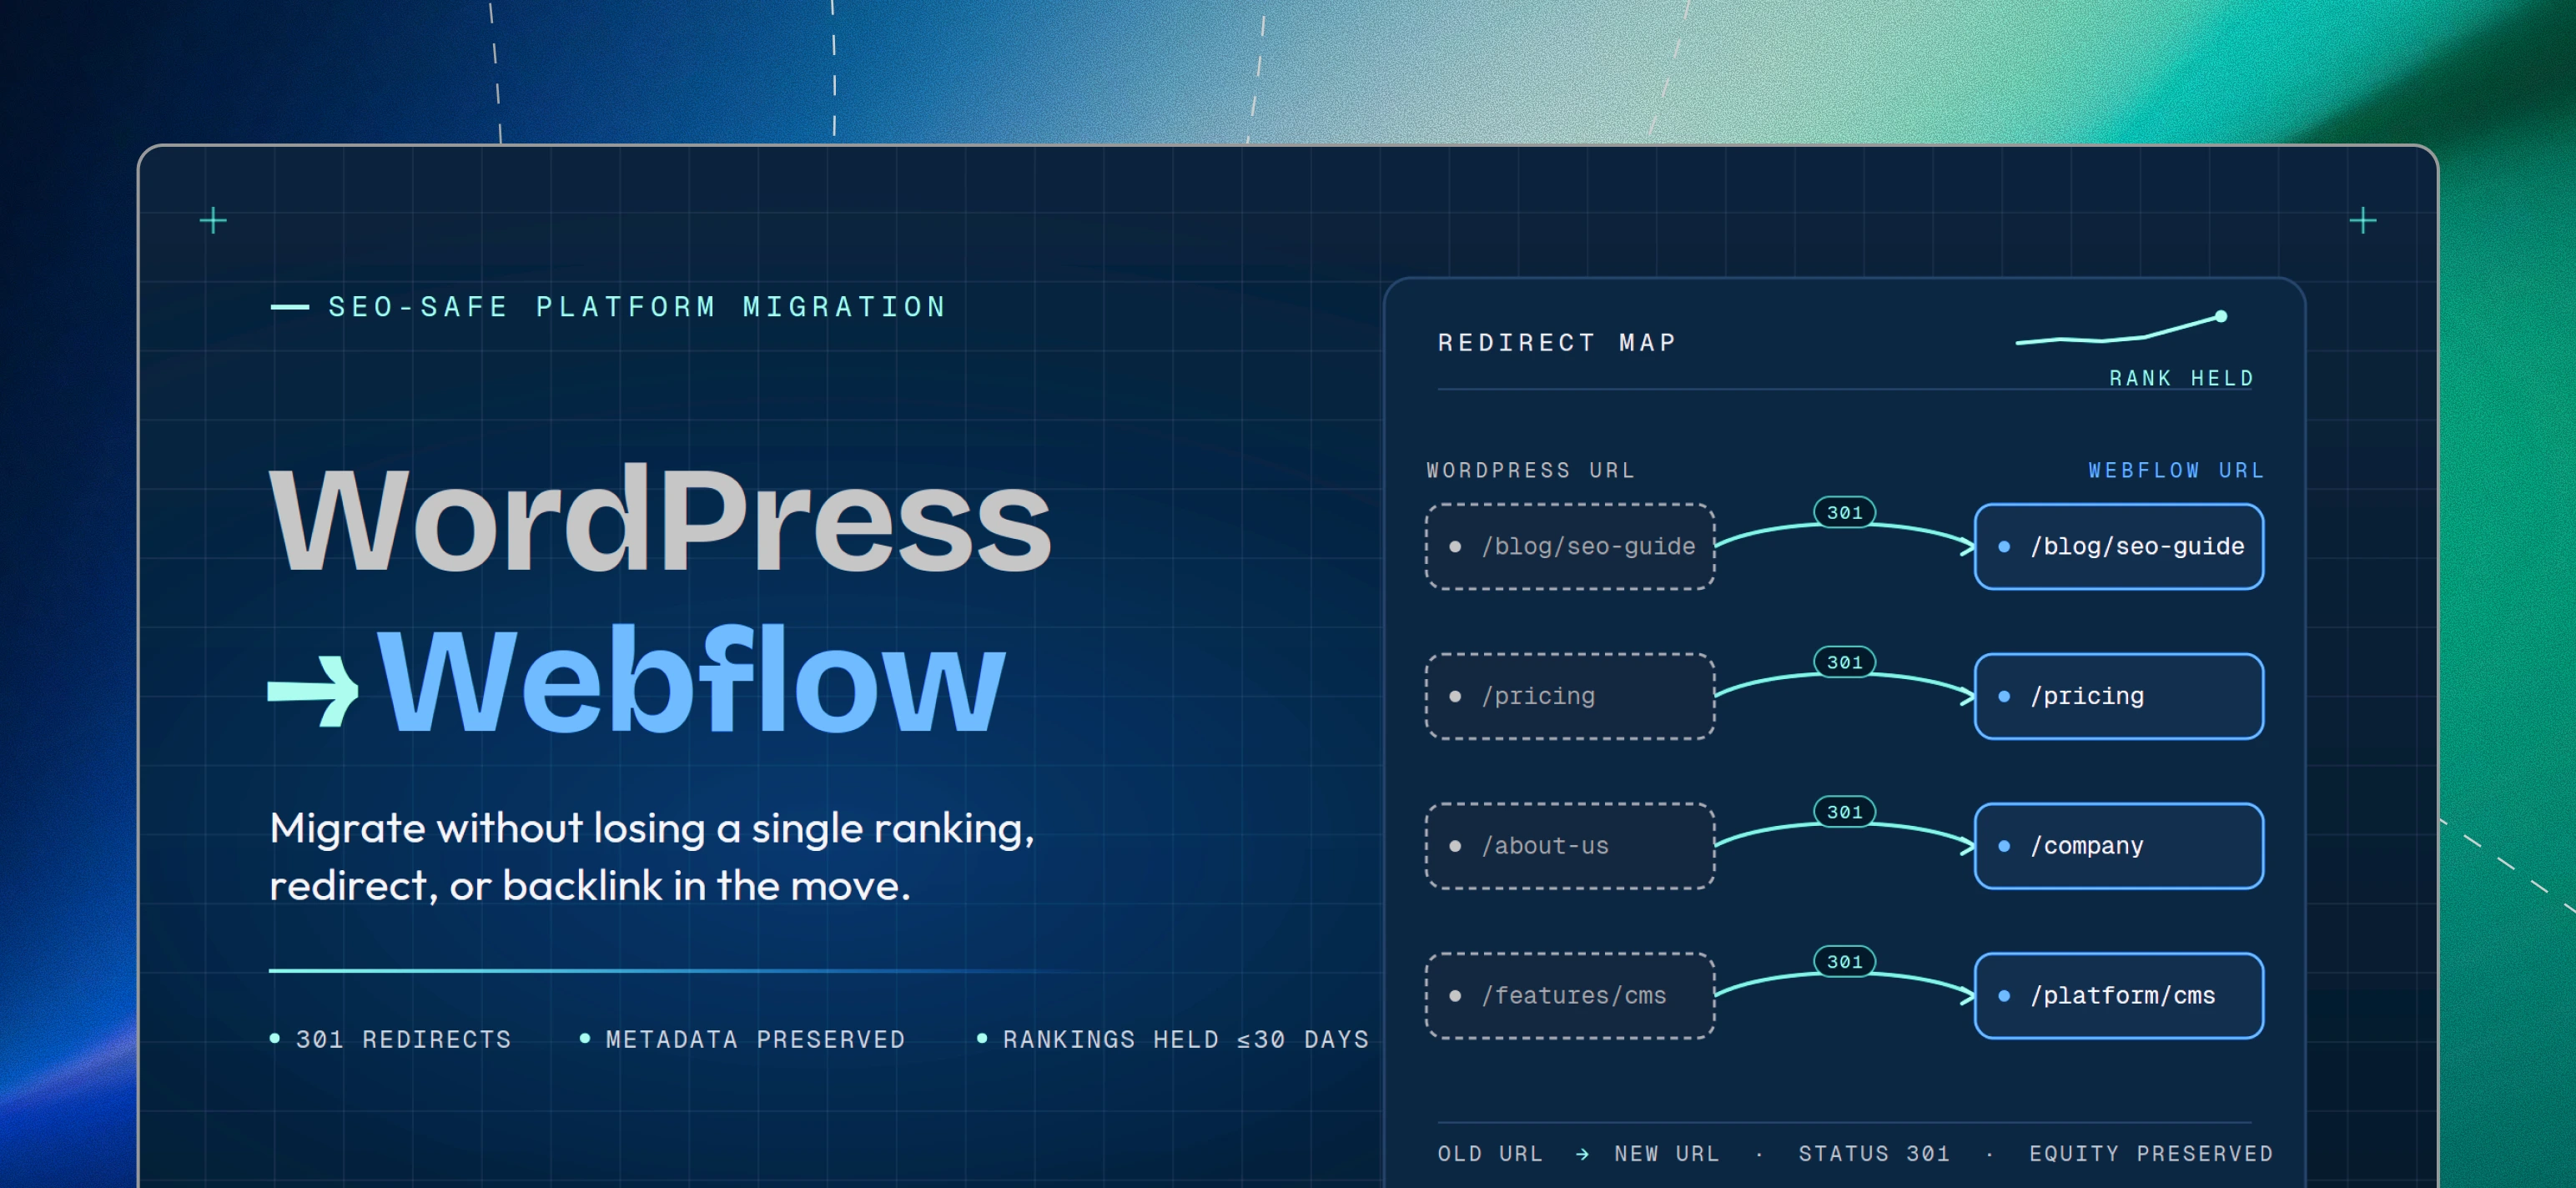
Here is what the data actually shows. Most ranking drops after a WordPress to Webflow migration come from skipping steps in the process, not from the platform change itself. Sites that handle the migration properly hold their rankings within 30 days. A good number improve, because Webflow ships cleaner code, faster load times, and better Core Web Vitals than most WordPress builds carry by default.

This guide covers what to do before, during, and after the move.

Why do sites lose SEO rankings during migration?

Most post-migration ranking drops trace back to a handful of avoidable mistakes. The table below covers the most common ones and what to do instead.

Common Mistake What Goes Wrong How to Prevent It
Not setting up 301 redirects Old URLs return 404 errors; Google drops them from the index Map every old URL to its new Webflow equivalent before launch
Losing meta titles and descriptions Pages lose their optimized on-page signals Export all metadata from WordPress and manually re-enter in Webflow
Changing URL structure Backlinks and internal links break Keep URLs identical where possible; redirect anything that changes
Skipping the sitemap resubmission Google doesn't know your new site structure Submit a fresh sitemap to Google Search Console on launch day
No pre-migration baseline No way to detect ranking drops post-launch Record all keyword positions, organic traffic, and Core Web Vitals before touching anything

Getting these five things right eliminates the vast majority of migration-related SEO risk.

Before you migrate: The pre-migration SEO audit checklist

Before you touch a single page, document everything. This is the step most teams skip, and it's the most important one.

What to export and record from your WordPress site:

  • All live URLs: Use Screaming Frog or Ahrefs Site Audit to crawl your entire site and export every indexable URL with its status code
  • Meta titles and descriptions: Export via an SEO plugin like Yoast or RankMath (CSV export available)
  • H1 and heading structure: Note the heading hierarchy on your top 20-30 pages
  • Top-traffic pages: Pull from Google Search Console; these are your highest-priority pages to protect
  • Backlink targets: Export from Ahrefs or Google Search Console; any URL with significant backlinks must either stay the same or be redirected
  • Internal link structure: Note which pages link to which, especially around your pillar content
  • Core Web Vitals baseline: Run PageSpeed Insights on your top 5 pages and save the scores
  • Current keyword rankings: Take a snapshot using Ahrefs, SEMrush, or even a manual Google check for 10-15 priority keywords
  • XML sitemap: Save the current sitemap URL for reference

This audit is your diagnostic baseline. Without it, you cannot prove that a ranking drop was caused by migration rather than something else Google changed that month.

Step-by-Step: How to migrate from WordPress to Webflow (SEO-safe)

Follow these steps in order.

Step 1: Export your WordPress content

Install the WP All Export plugin and export all posts, pages, and custom post types as a CSV. This gives you a clean content file that can be imported into Webflow's CMS Collections. Export your images separately if you have a large media library.

Step 2: Map every old URL to a new Webflow URL

Create a redirect map spreadsheet with two columns: the old WordPress URL and the new Webflow URL. Do this for every page, not just your homepage. Pay special attention to:

  • Blog post slugs (especially if you're changing the URL format)
  • Category and tag pages
  • Any pages with backlinks pointing to them
If a URL stays exactly the same in Webflow, it doesn't need a redirect. Identical URLs are always the safest choice.

Step 3: Rebuild pages in Webflow and transfer all metadata

As you build each page in Webflow, immediately fill in the SEO fields: meta title, meta description, Open Graph title, and Open Graph description. Don't leave these for later; it's easy to forget pages when you're moving fast.

Also replicate your heading structure exactly. If a page had one H1 and three H2s on WordPress, it should have the same in Webflow. Webflow gives you clean semantic HTML by default, but the heading hierarchy still needs to match your original intent.

Step 4: Set up 301 redirects in Webflow

Go to your Webflow project settings → Hosting → 301 Redirects. Enter each redirect from your URL map: old path on the left, new path on the right. If you have a large site with 100+ redirects, manually entering each one is time-consuming. This is a stage where many teams bring in a Webflow agency to handle the bulk mapping and QA efficiently. Test every redirect before you go live. A broken redirect is worse than no redirect at all.

Test every redirect before you go live. A broken redirect is worse than no redirect at all.

Step 5: Rebuild your XML sitemap and prepare for resubmission

Webflow automatically generates an XML sitemap for your published site. Before launch, confirm it's enabled under Project Settings → SEO → Sitemap. After launch, go to Google Search Console, remove the old sitemap, and submit the new one. This tells Google to recrawl your site with the updated structure.

Step 6: Test for broken links and crawl errors before launch

Run Screaming Frog against your Webflow staging URL before publishing. Look for:

  • Any 404 or 302 status codes that should be 301
  • Missing meta titles or descriptions
  • Images without alt text
  • Pages accidentally set to "noindex."

Fix everything on this list before your domain points to Webflow. Once you flip the DNS, the clock is ticking.

After launch: The 30-day SEO monitoring plan

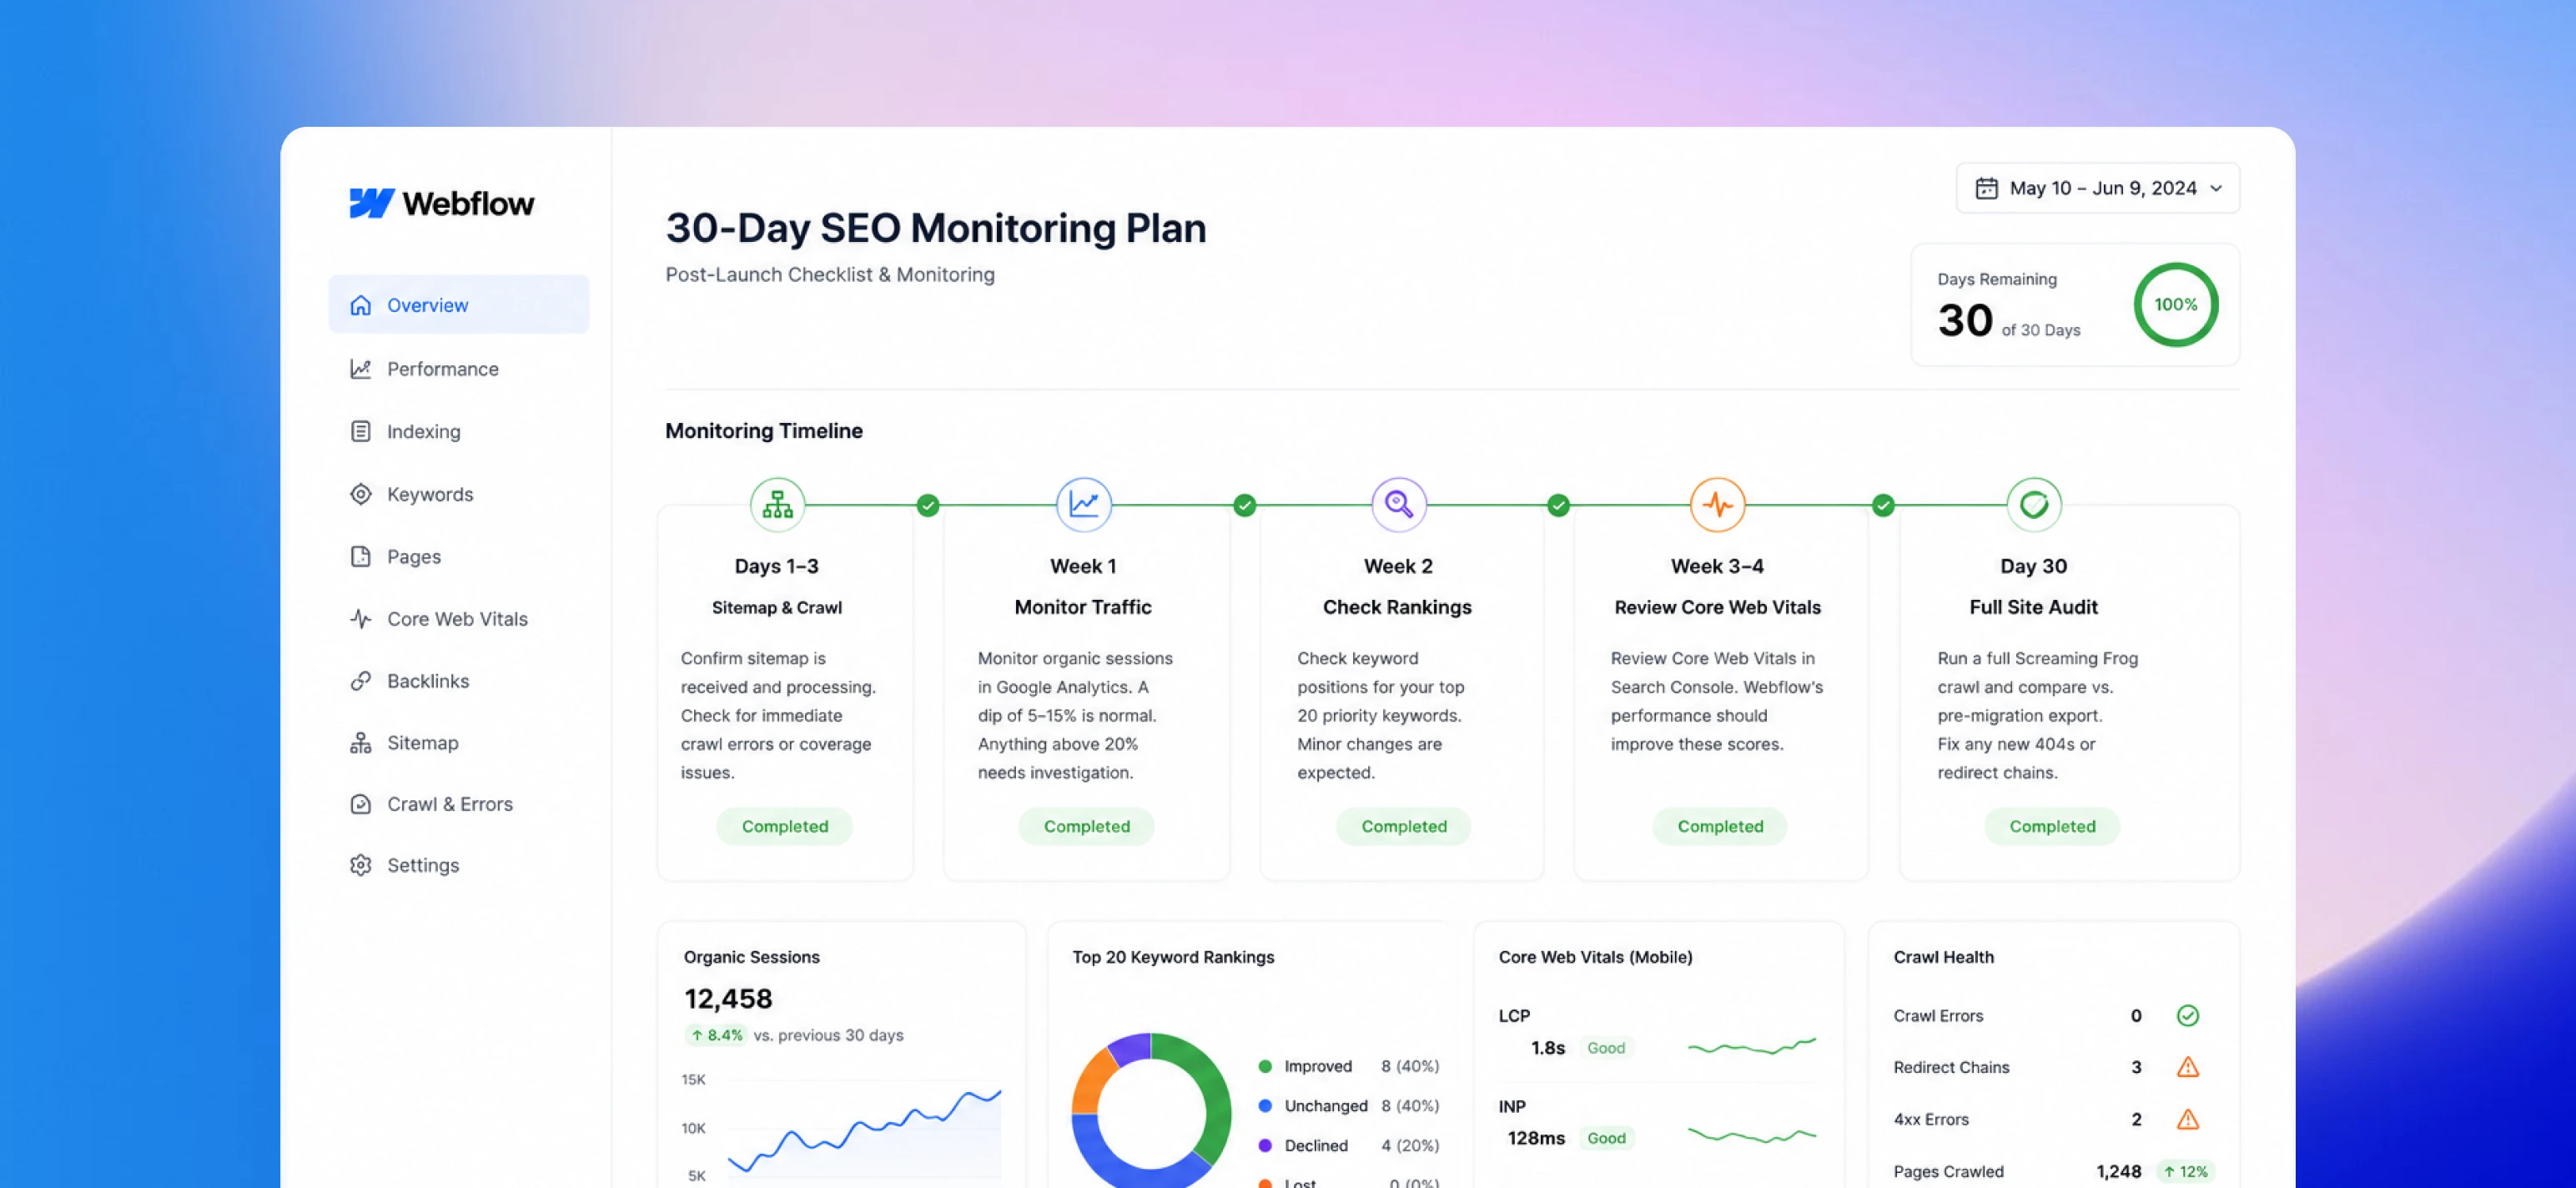
The work doesn't stop on launch day. Here's what to check during the first 30 days:

  • Days 1-3: Confirm Google Search Console has received and is processing the new sitemap. Check for any immediate crawl errors or coverage issues.
  • Week 1: Monitor organic sessions in Google Analytics. A dip of 5-15% is normal and typically temporary. Anything above 20% warrants investigation.
  • Week 2: Check keyword positions for your top 20 priority keywords. Minor changes are expected.
  • Week 3-4: Review Core Web Vitals in Search Console. Webflow's performance should improve these scores. If they're worse than before, investigate image sizing and third-party scripts.
  • Day 30: Run a full Screaming Frog crawl of the live Webflow site and compare against your pre-migration export. Any new 404s or redirect chains need to be fixed immediately.

A persistent decline (organic sessions down 20%+ after 30 days) usually points to one of three things: missing redirects, metadata that didn't transfer correctly, or pages that were accidentally set to noindex. All three are diagnosable and fixable.

After launch: The 30-day SEO monitoring plan

WordPress to Webflow migration is not inherently risky for SEO. The risk lives entirely in the execution, specifically in the steps that get skipped when teams are moving fast or treating the migration as purely a design project.

The checklist is not complicated: audit before you move, map your redirects, transfer your metadata, test before launch, monitor for 30 days after. Teams that follow this process keep their rankings. The ones that skip steps are the ones writing recovery post-mortems three months later.

A failed migration is fixable. It just costs three things you did not budget for: the months it takes Google to re-trust your new URLs, the organic revenue you bleed while waiting for rankings to recover, and the conversation where you explain to your client or your CMO why traffic dropped 40% the week after the new site launched.

Getting a technical SEO review before launch is not a nice-to-have. It is the cheapest line item in your entire migration budget, and the only one that guarantees you do not spend the next quarter undoing the damage from skipping it.

Author

Soumya Dheeman Kar

FAQs

Does migrating from WordPress to Webflow hurt SEO?

It doesn't have to. When the migration is handled correctly, with proper 301 redirects, transferred metadata, and preserved URL structures, SEO rankings can be fully maintained. In many cases, sites see improvements within 60-90 days because Webflow's clean code and faster load times improve Core Web Vitals scores, which are a Google ranking factor.

How long does it take to recover SEO rankings after migration?

Minor variations are normal in the first 2-4 weeks as Google recrawls and reindexes the new site. Most sites return to their pre-migration baseline within 30 days, assuming redirects and metadata were handled correctly. A full recovery (including any new ranking gains from improved performance) typically takes 60-90 days.

What happens to my backlinks when I move to Webflow?

Your backlinks are tied to your domain, not your platform. As long as the URLs that backlinks point to either stay the same in Webflow or are properly 301 redirected, the link equity is preserved. Backlinks to URLs that return a 404 will lose their value, which is why redirect mapping is the single most critical SEO step in any migration.

Do I need SEO plugins in Webflow like I did in WordPress?

No. Webflow has native SEO settings built in: meta titles, meta descriptions, Open Graph fields, canonical tags, noindex controls, and auto-generated XML sitemaps are all accessible without plugins. This is one of the operational advantages of moving to Webflow: you eliminate a layer of plugin dependency that often causes conflicts and performance issues on WordPress.

Can I migrate my WordPress blog posts to Webflow CMS?

Yes. Using the WP All Export plugin, you can export all posts as a CSV and import them into a Webflow CMS Collection. The process takes some setup (you'll need to configure the Collection fields to match your content structure), but once it's done, all your posts, metadata, and categories transfer cleanly. Images may need to be handled separately if they're hosted on WordPress's media library.

How do I set up 301 redirects in Webflow?

Go to your Webflow project settings, navigate to the Hosting tab, and find the 301 Redirects section. Enter the old path (e.g.,/old-blog-post-url) in the left field and the new destination path (e.g.,/blog/new-post-url) in the right field. Webflow applies these redirects automatically on your published domain. For large sites, using a spreadsheet to manage your redirect map before entering it into Webflow will save significant time and reduce errors.

Related Articles

Ready to start the project?

The journey’s just as exciting as the destination. So, what are you waiting for? Let’s hit the gas.